|
Tips To Help Your Game
THE PROPER GRIP
Read this slowly and carefully, one position at a time
Doing each hand position as suggested in the order below.
You should repeat these moves until it becomes natural.
Practice is essential to make it work for you.
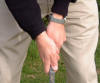

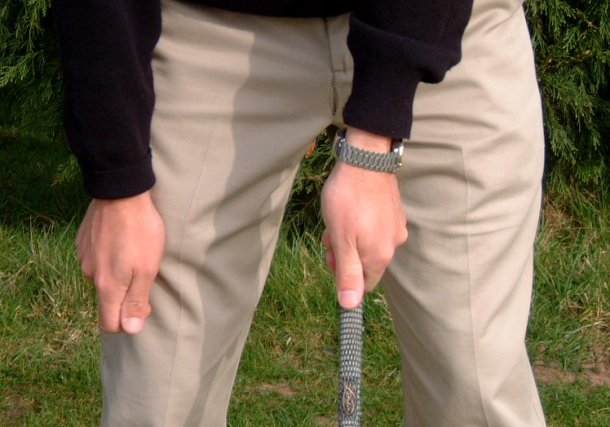
T To attain the ‘proper’ hand position, grip pressure, thumb placement
and how to place the shaft properly in your fingertips.
These instructions are written for right hander's.
(For left hander's reverse left & rights).
Hold your hands in-front of your chin, palms facing each other, elbows relaxed,
the back of the left hand and the right palm facing the target.
(This relationship of your hands should never change.)
Move your left hand away so that the left thumb rests in the
lifeline of your right palm.
The left thumb will now be just under and below the right thumb.
Intertwine the right little finger between the index and middle
finger on your left hand.
The V formed by the index finger and middle finger of your left hand
points at your right ear.
The V of the right hand points at your right ear.
The thumbs should never be on top of the shaft except when putting.
The shaft lies in the fingertips of both hands, not the palms.When held properly, the butt end of the grip
rests under the fatter part of your left hand, at the base of your
little finger;
the shaft rests in the first joint of your left index finger.
You should be able, to lift the club comfortably from this position
with just your left hand (right for lefties)
Here’s how:
Start with the club at your left side (right for lefties).
Your target side forearm and shaft in a relatively straight line.
Lift the club off the ground with your target side index finger.
Your forearm is now parallel to the ground;
the shaft is at an angle of about 30°,
with the toe of the club pointing up.
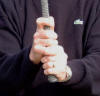
To place your right hand on the club,
Do NOT bring your left hand to your right!!
You must bring your right hand to the left.
Lower your right shoulder slightly so that your upper body tilts to
the right.
Lower the right shoulder; do NOT raise the left shoulder.
With both hands on the club
bring your hands and club in front of your chin again.
If you can see two knuckles of your left hand
and two knuckles of your right hand, you’re off to a great start.
You now have
THE PROPER GRIP
PROPER BALANCE
Prevents swaying side to side, and
back and forth.
Brings the club back to the ball squarely.
Golf is a game of ‘feel’. Just as you want to ‘feel’ the grip in
your fingertips, you also want to ‘feel’, for ‘proper balance’,the
soles of your feet holding the ground.Stand comfortably erect, with
your feet shoulder width apart.
Since we are all slightly different, some of you will be a bit
wider, some a bit narrower.
Find your comfort zone! There should be no tension in the area of
your upper groin.
If you feel tension, you are too wide: bring your feet closer
together.
From this position, flex your knees slightly.
You should ‘feel’ the soles of your feet ‘holding’ the ground.
If you do not, you are too tense or too rigid.
Get rid of the tension by taking a deep breath and letting it go.
‘Feel’ your body relax, your knees flex and you’ll get the ‘feeling’
Finally, distribute your weight between the balls of your feet and
your heels. you want to be able to raise your toes freely on the
inside of your shoes. There is no weight on your toes! EVER! From
this proper balance position, your club will come back to the ball
squarely. Not in the ‘toe or heel’ You will be able to ‘coil’ your
hips and shoulders Around your spine angle rather than slide from
side to side. Sliding is a ‘no no’! The shoulders and hips must
coil. From this new found ‘balanced’ position; hold your club in
front of you. With the shaft at waist height and parallel to the
ground. Hold the club just tight enough so that it cannot be taken
from you. Then have a friend hold the club head, and gently pull you
forward. If you have balance, you will not move. Next, have your
friend push you back. Again, you should stay in the balanced
position.
Please read this slowly and perform each position as you read and
then do it again. It’s all part of the practice routine. And
remember, it’s a game! Have fun!
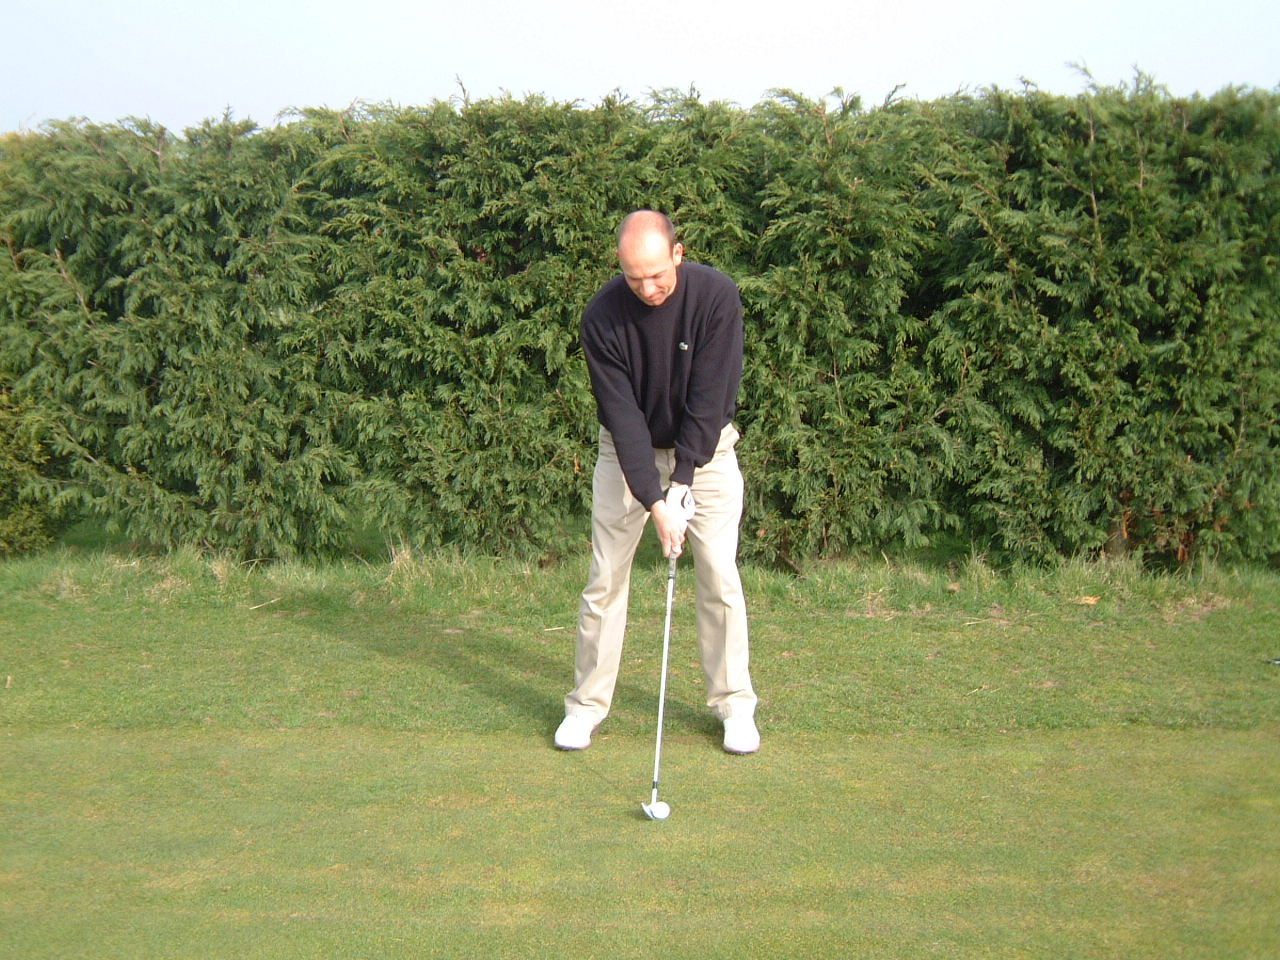
PROPER POSTURE
Prevents dipping or raising up and hitting thin or fat shots.
The golf swing is a coil, pivot, turn or rotation around the spine
angle.
To coil properly you need to have the ‘proper’ posture.
Start by standing comfortable erect, hands hanging at your side.
Doing this in front of a mirror will be a great advantage. Please
notice how your shoulders are below your chin. You must maintain
this relationship while doing the following: tilt forward from the
hip (your bottom should feel like it is protruding slightly with a
slight arch in your lower back). until your arms are hanging over
your toes.
Look at yourself in the mirror and notice your head and shoulder
relationship.
Pretty much the same as when you are standing straight.
Repeat this routine with a club. When you are set,
look in the mirror, take a deep breath, and let it all out,
then soften your right side so that your shoulder drops a bit and
you appear tilted.
Do NOT lift your left shoulder, but drop your right.
With your arms hanging from the shoulders and without the feel of
‘reaching’,
your right elbow should be resting gently against your rib cage.
It is important that you notice the lack of tension. Tension in the
golf swing is a killer.
Tight muscles will not project the ball properly.
Remember! Practice and repetition is the name of the game.
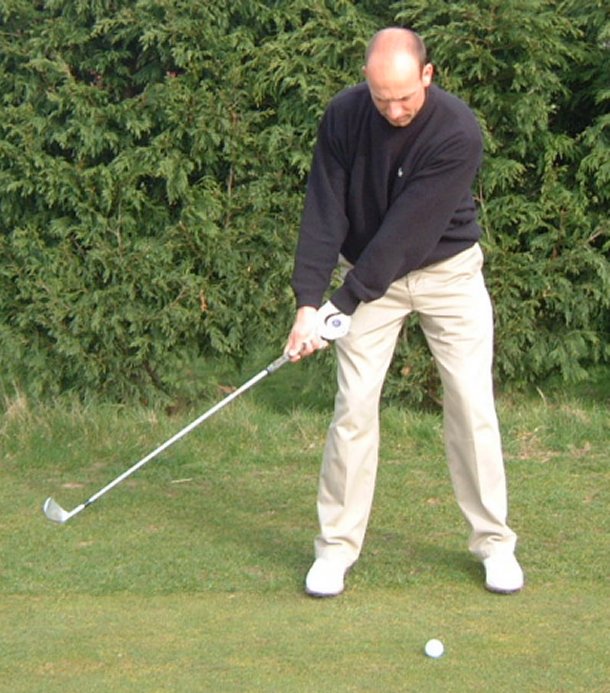
BALL POSITION

Improper ball position causes erratic ball flight.
There are two schools of ball positioning: which one is right for
you? The first is to set your feet about shoulder width apart, and,
maintaining this distance, move both feet to the left or right
depending on which club you are using. The other is to start with a
narrow stance for the short clubs. Then position the ball just left
of centre, as the club gets longer, only the back foot gets wider.
Each golf club is made to do a specific job and is constructed
accordingly. Starting with the pitching wedge, position the ball
just left of centre of your stance. With each progressive club,
widen your stance moving only the right foot until the clubface is
square to the target line. Never is the clubface adjusted by the
movement of your hands. You can see this more readily if you compare
this now with a wedge and a three iron. Set up first with the wedge
and then the three iron without moving your feet. Notice that the
three iron appears open. To square the clubface, move your right
foot to the right until the three iron is square to the target line.
Because the three iron is longer, you will have to step back away
from the ball the same distance as the club is longer or shorter.
ALIGNMENT

Alignment is the positioning or aiming or your clubface and body:
(feet, knees, hips and shoulders) in the same direction. If your
clubface is aimed in one direction and your body in another, the
ball will not go straight. Stand behind your ball facing the target.
Pick an item (leaf, pebble, cigarette butt) about six inches in
front of your ball directly in line with the target. This is your
‘target line’ .Set-up to the ball with the leading edge of your
clubface at a right angle to the target line. Your toes, knees, hips
and shoulders should be parallel to the target line; aimed slightly
left of the target. As if stood on a railway track (ball on one feet
on the other). If your shoulders and clubface both face the target,
you will be apt to hook. If your shoulders are too far left of the
target and not parallel to the clubface, you will slice. Practice
your set-up in the mirror, or place two clubs down in front of you
on the practice tee .One at your toe line and the other on the
outside of your ball parallel to the other club. Again, practice the
set-up. Get the help of a friend, or use your mirror. The mirror is
your best help.
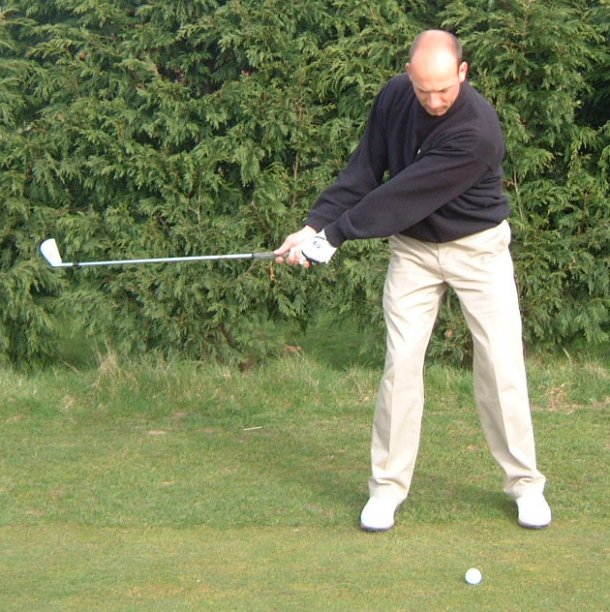
TAKE-AWAY

One of the biggest problems on the take-away is that most players
roll their wrists immediately upon taking the club back. The PROBLEM
is that the clubface stays open and There fore, will not come back
to the ball squarely. The take-away is a one-piece motion. Your
shoulders and hips coil around your spine angle, away from the
target, all at the same time. There must be a transfer of weight
into a braced right knee, which means that the right knee stays in
the original position. The shoulders take the club back until your
hands are just over the back knee, with the shaft now parallel to
the ground, the toe of the club facing the sky. Your left thumb in
this position should be on the top of the shaft in the same
direction as your chest.

STOP
HERE!! REPEAT THIS MOTION.
AT THIS POINT YOU ARE STARTING TO BUILD A GOLF SWING. THE REST NOW
GETS COMPLICATED AND PERSONAL INSTRUCTION SHOULD BE TAKEN!
TIMING

The proper rhythm will keep you from swinging back too slow or too
fast and will allow the golf club to do its job. Your golf clubs are
actually made to work for you. All you have to do is hold the club
and swing properly. Proper timing, simply put, is taking the golf
club back, slowly, in a rhythmical fashion. Swinging the club back
too quickly will easily, throw you off balance; swing back too
slowly and you will find yourself getting too tense. In the golf
swing we need to save our speed for the downswing. Swing back too
quickly, and you are throwing away the energy needed on the
downswing. Think of building up your energy whilst you swing back.
Imagine swinging to the rhythm of a metronome, counting as you swing
back.
Doing it out loud will help.
For starters, on the back swing, count as follows; 1,2 on the back
swing, then 3,4 on the downswing. Bring your hands back only to
waist high; ditto on the follow-thru. As your timing improves, you
can then count, 1,2,3 back and 1,2,3 down.


|
Top Tip |
 |
|
Practice a single swing change for
at least 3 to 4 weeks.
According to
experts in muscle or more appropriately, motor memory, a single
swing change can take a minimum of three to four weeks to ingrain
into your swing depending on the complexity of the change, how long
you have been doing it wrongly and how long and well you practice.
During this time it’s important to only be training the muscles for
this single swing change. Follow-up lessons should be for the
purpose of monitoring your progress and to ensure body positions and
the motion for the change are being practiced correctly. You should
not be going to your lessons expecting to learn something new each
time.
|

|
|
Quality practice.
Quality
practice does not only have to happen at the driving range. Many top
instructors recommend practicing at home without a ball to focus
your attention on posture, balance, body position and movements
without having to concentrate on hitting a ball.
|
|
|
Have fun while learning, set
yourself reasonable expectations.
The key is to
work with your instructor, vary your drills and make them fun. This
shouldn’t feel like boot camp. Don’t set your expectations too high
for your first swing change. Allow yourself time to improve. Once
you see the first change start to take hold and your game improve
you will get an enormous boost both mentally and emotionally.
|
|
|